People choose lay laminate flooring for its inherent scratch, stain, and burn resistance, which exceeds every other flooring category. Additionally, laminate options are almost as waterproof as hybrid and vinyl floors.
Although sound underfoot with installed laminate flooring can be undesirable to some people due to the product’s reflective nature, the benefits of this product outweigh any disadvantages. Another great advantage of Laminate flooring is its ease of installation.
This blog provides all the information you need to lay laminate flooring, including preparation, DIY considerations and after-care.
Gear list:
- Saws (Jigsaws and Drop-saws make life easier)
- Dust mask
- Earmuffs
- Knee pads
- Sawhorse
- Chalk line
- Pull bar or pry bar
- Tape measure
- Tapping block (a piece of trimmed flooring)
- Pencil
- Metal Straightedge
- Multitool
- Set square
- Spacing blocks
Floor Inspection and Preparation
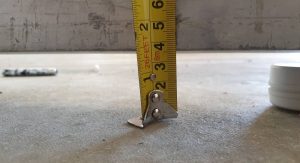
You can install laminate flooring over hard surfaces such as PVC, ceramic tile, and concrete, provided it is an even surface. Pull up any existing floor coverings to reveal a concrete subfloor so the underlay can go down later. Before laying laminate flooring, you must test whether the subfloor is level. If you have predominantly low points and only a few high points, it may be possible to even these points out yourself; otherwise, you will need the help of a professional, as most DIY-ers will. This article provides all the necessary information and explains why subfloor preparation is essential for long-lasting, beautiful floors.
Assuming you have read the above link and the floor is ready and level, clean the subfloor off, making sure your floors are debris-free as you go. Conducting a thorough floor inspection before diving into the installation process is crucial. This step fully prepares you for the project ahead. Start by walking through the house and identifying any problematic areas. Begin in the direction you will lay the floor against the longest wall in the house, planning outwards.
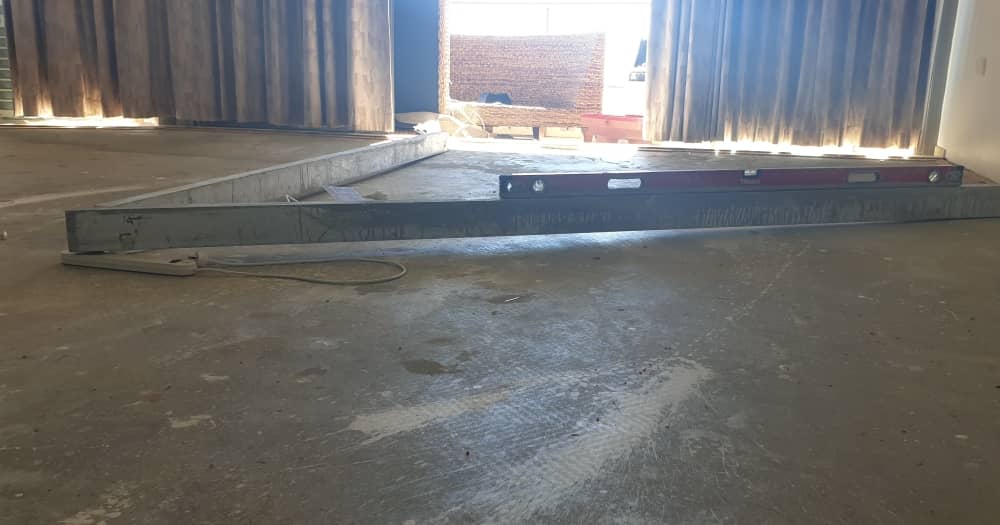
The workers set up the straight edge at a spirit level.
An uneven concrete subfloor tolerance against a straight edge that will need levelling.
Calculating Floor Area by Board Widths
Measure and calculate the floor area, considering the size of each installed laminate board will be. Consider the width of the house’s biggest area and your product’s width. Divide this area by the width of each product to determine how many board widths wide this area is.
If, for example, your area is 8.25m in width and you are working with a plank that is 228mm wide, then your area is 36.18 mm wide. You may decide that you don’t want to finish with a board that is 0.18 of a board width wide as this is quite small and may not be visually the best appearance. Instead, work out what .09 of a board width is, and cut this from the side of your starting row. This will ensure that you need to take the same amount from the final row and maintain the symmetry of your floor. Read on and learn the best ways to cut laminate boards.
Plan for these eventualities before you begin and look for areas likely to cause you potential issues as you lay the laminate floor. Try to anticipate this kind of thing before you begin. Sometimes, you can solve this by adjusting the amount you take off the first row, as discussed above. You may find that solving one problem causes another, so have patience, measure twice, and cut once!
Scotia and Skirting Removal
This process is the same for all flooring types, including laminate flooring:
- Run a sharp knife between the skirting/scotia and the wall, cutting through the paint seal.
- Use a pair of butter knives or paint scrapers to remove skirting.
- Gently tap one down behind your first area where you will start.
- Once you create a small opening, bring your second knife or scraper in and gently pry away from the wall.
- As you put the skirting/scotia aside, number the back of each piece sequentially as you work your way around the house. Remember where you started!
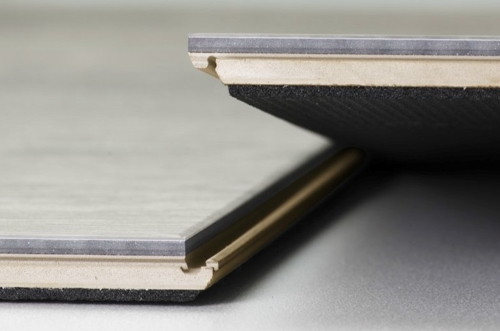
Laying the Underlay
One difference from installing hybrid flooring is laying laminate flooring on a separate underlay.
The underlay is typically about a metre wide, and one side has adhesive tape on the bottom. The other side has a plastic membrane at the top. This plastic membrane overhangs the underlay by about 100mm and attaches via the adhesive strip to the next row of underlay. This creates a streamlined, waterproof moisture barrier underneath as you go.
Many installation guides suggest laying all the underlay before starting the laminate flooring. Small draughts can cause the light underlay to move around the floor until it is weighted, making this a mistake. I have found it is far easier to lay the underlay as you go, with the plastic membrane facing the ground and the 100mm overhang facing away from your working direction. This ensures that as you lay, you add weight as you go, and your underlay does not take off on you!
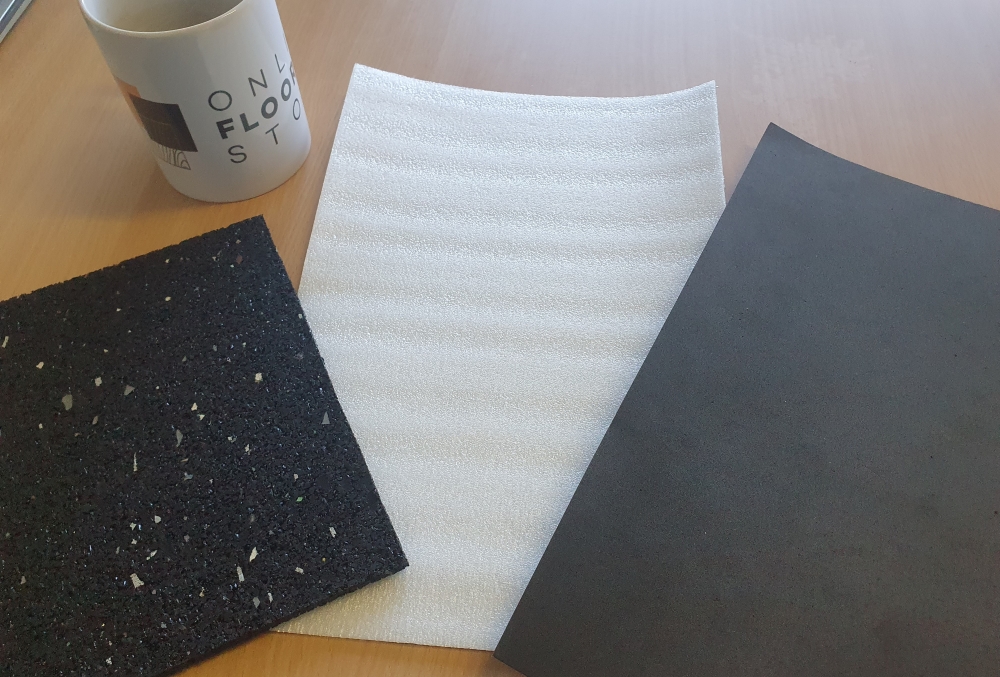
Rubber underlay on the left. Open cell foam underlay in the middle. Closed cell foam underlay on the right.
Use Closed-cell Foam Underlay
We highly recommend only using closed-cell foam underlay when installing laminate flooring. It is designed to last the life of your floor and is less likely to sustain damage during installation. Open-cell foam is cheaper but really is of little use after the first year or so. It will compress over time and provide no real benefit.
Rubber underlay is unnecessary when laying laminate flooring, and even in commercial scenarios such as high-rise apartments, closed-cell foam performs just as well as rubber, if not better. But make sure you get the right density. Rubber underlay is also more expensive and only necessary when using engineered timber flooring in a dual bonding application. This is not relevant for laying laminate flooring.
There’s a lot of talk about acoustic underlays or higher-density underlays. Unless you have some specific acoustic application where your noise is affecting somebody else’s apartment, it’s not really worth considering. Acoustic underlays will change the sound of the floor, but they will not change the amount of noise in domestic applications, especially with single-storey dwellings. For all the information on underlays you need, read this blog: What is underlay, and does your floor type need it?
Understanding Expansion Gaps and Raft Breaks
Laminate flooring can absorb moisture and expand and contract through the seasons. Suppliers recommend expansion gaps between the flooring and fixed objects to allow your flooring to expand and contract through the seasons. Raft breaks divide the floor into different sections, creating smaller areas to facilitate expansion. This blog on the acclimatisation of your timber floor covers how the climate can affect your product. Although this is less critical for laminate flooring, most installation guides recommend a short acclimation period for the product.
Expansion Breaks will follow the contour of the floor around every fixed object. This includes kitchen benches, railings, and other fixtures permanently fixed to your floor. The product’s installation guide will tell you the required clearance amount.
To maintain your warranty, plan raft breaks in advance and comply with the supplier’s requirements. For example, if your installation guide states you can go up to 12 meters in length by 10 meters in width, do not exceed these dimensions and break the floor into separate “rafts.”
Try to plan raft breaks where they can be as unobtrusive as possible. For example, if your floor area is 16m in width, you do not need to break the floor into two even rafts 8m in width, as this could well involve running a single long break right down the middle of your floor. It just means that a raft cannot exceed these dimensions. Instead, try to move the break to a doorway. This will make it far easier to install your floor and make it look less unsightly.
Scribing the Wall & Installing Your First Row of Laminate Boards
Few walls are straight. Most will require that you scribe (trace) your first row of boards to keep to the contour of your wall:
- Once you have worked out the amount you want to cut from your first row of boards, you will want to set up a chalk line this far away from the wall. This line will move in and out from the wall as it is unlikely to be straight. So try to get an average and set the line up straight by eye.
- Dock the end of your first board, and take off the join at your starting end. You won’t need it. Then, place the edge of your board facing the wall back away from the wall on the string line you have set up.
- Next, take a small section of the flooring (about 20cm wide) and carefully remove the joins from the side of the board. This will leave you with your scribing tool, which is exactly the width of the face of your laminate flooring. This is important because you have set up your string line off the wall at the exact distance of the width of your first run of boards.
- Place your scribing tool against the wall and a pencil on the other side against your flooring. Move the scribing tool along the wall and mark your board for cutting as you go.
- Once you have marked your first board, make a pencil mark on the floor where this board ends so you will know where to place your second board, and then scribe this one.
- Work your way down the wall, marking each board as you go. It may be advantageous to number each board with a pencil as you go so that you remember which board went where. When you reach the end of this row, the last board will likely need to be cut to fit in place. Do this before scribing this board.
- Once this is done, use your jigsaw to cut each board. Learn how to cut laminate boards prior to installation below.
- Start to assemble these boards. As you do, install aboard on the side of your freshly cut boards that still have their joins. Ensure that these boards are staggered so that one end join is not beside another. You can set this entire section of flooring up out from all to give yourself the space you need to lock them together.
- Once you assemble this run, place some spacers against the wall and slide the entire raft of flooring into place. This will ensure that it is exactly where you want it to be.
- Finally, get down onto your hands and knees and look down the line between the 2 rows of boards you have assembled. If the line is straight, then you are good to go. Now, you can assemble the rest of your floor, knowing everything has been set up correctly.
Undercutting Gyprock
Laminate is far more prone to growth than a hybrid because it is prone to environmental moisture ingress, whereas a hybrid isn’t affected by that. Therefore, it’s far more essential to plan for the correct amount of expansion with a laminate. Undercutting a gyprock is one way to increase the expansion room available. Although scribing prior is less needed when undercutting gyprock, we recommend it for particularly uneven walls.
To do this:
- Use an offcut of laminate flooring and an offcut of underlay of the same size.
- Stick them together with tape.
- Use your multitool with a blade fitting perfect for undercutting (this one generally is a curve about 270° around,) place it on your laminate & underlay offcuts, using them to run across the Gyprock, undercutting it at the ideal height.
- This will give you the clearance for the freshly installed laminate flooring to expand underneath.
Like Gyprock, you can also undercut door jambs where the laminate flooring transitions from one room to another. Once again, it would help to undercut the door jambs so the laminate has enough room to expand underneath. This will also provide a much cleaner look than cutting the laminate flooring to fit around the door jam.
Laying Laminate flooring Continued
Above, we went through cutting and installing our first two rows of laminate boards and setting them up against the wall. Now, continue laying new boards. You will soon learn that there are better ways than just laying a single row at a time. You will often find that working on a few rows at a time means you get up and down far less often.
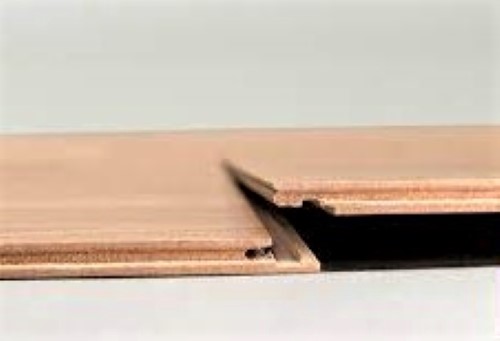
As the floors are assembled, ensure there are no gaps between the planks. If gaps occur, this means the locking mechanism hasn’t been engaged properly. Once you are familiar with a product, feel can do this.
However, if you are unfamiliar with the product, gently tap the boards together until the locking system properly engages and the gaps disappear. You can use a plastic tapping block available at hardware stores.
Our Tapping Block Method
- Cut this piece in half down the centre so the male and female joins are separated.
- Look at the join you are tapping into. If you are tapping into a female join, then lock the male join from this offcut into the female join of the board you are engaging. Reverse this process if you are tapping a male join.
- Tap the offcut rather than the boards you are laying.
This way, pressure is not directed by a hammer or a rubber mallet directly into the join, and pressure is distributed evenly. Your homemade tapping block fits precisely into the product.

Expert Insights From Clem Sturgess
20+ years' experience in hard flooring
If gaps occur in the floor, The floor will not feel right. Improperly engaged boards can create noise and will damage the locking system over time. Additionally, as boards are staggered, an improperly engaged board that leaves a gap will create a ripple effect across the remainder of the floor. This will cause misalignment from this point onward, and the problem will get worse the further out you lay. One little gap will create big problems later. Test your boards and take your time.
Provided you did a good walkthrough and properly identified potential problem areas; you should have no dramas with installation.
How to Cut Laminate Floorboards
Laminate boards require a little more effort than hybrid boards but are still straightforward to cut:
- Measure and mark your board where it needs to be cut
- In most cases, such as cutting the ends off the boards to fit the lengthways run, a drop saw will be your go-to tool for a clean cut.
- A jigsaw is handy when cutting around odd shapes you cannot practically cut with a drop-saw.
Marking & Cutting Laminate Around Corners
Marking and cutting a board around a corner is very straightforward:
- Line and mark the board against both angles on the wall by marking the side and the end of the board
- Use a set square draw and connect the lines on the board, bringing them together
- Use a jigsaw to cut the markings and take out your refuse piece. Simple. Keep these off cuts until the end as they can be used as tapping blocks, scribing tools, or projectiles when you feel frustrated!
Cutting Around Door Jambs
The first few times, it feels like a long process, but following these steps will make it easy. Be sure to read more about locking systems in the paragraphs below. Assuming you have already undercut the door jamb, proceed with the following:
- Lay flooring one row before the door jam. The next row will include the board that needs to go under the Jamb.
- Place the board that is to go under the door jamb over the top of the last row that you have laid, and scribe the shape of the door jamb onto the board.
- Now, scribe the board as if it is going around the door jamb, but since we want it to fit under the door jamb, we need to make a couple of adjustments.
- Adjust the lines on the areas to fit under the door jambs themselves. Ensure that the lines you make leave enough of the board to fit under the door jamb but clear the house frame that the door jamb conceals. This will leave you with a clean finish when you are done.
- Cut away the refuse sections of your board.
- Remove the last row of boards to the point where you can work in the area around your door.
- Take the board you just cut and slide it under the door jamb to put it in place. You will have a little clearance, so push it in a little further than it needs to go.
- Reinstall the boards in the row before that you have just removed.
- Now, you need to pull the board you just inserted under your door jamb back into the locking system of the boards you just reinstalled. Depending on where you are working, this will be done with a hammer and pull bar or tapping block.
- This is a simple process if you are working with a Uni-Clic 4-sided Locking System. Start tapping the board. The Uni-Clic system allows you to lay the boards flat on the ground and connect them without damaging the locking system. You will hear the product click when the join comes together properly, and there will be no gap between the planks.
Door Jams and Other Locking Systems
If you use Valinge 2G and 5G locking systems:
- Door jambs are not so simple if you work with any other locking systems. With a fair amount of skill, patience, and frustration, you can apply pressure, wiggle the product, and eventually get it into place.
- With a sharp chisel, shave the bottom lip off of the female side of the board where you are joining. You don’t need to take the entire thing off, simply shave off the last little bit that crops upwards. Then run a line of cross-linking PVA Adhesive into the female join. Next, bring it together just like a Uni-Clic Lock, but there will be no sound when the board engages, as it will not properly engage.
- Just bring the boards together until there is no gap between them. Clean away any adhesive that squeezes out, and wash the area several times. Next, tape the boards together and leave this tape in place until the job is done. This will give your adhesive plenty of time to set and ensure any vibration does not shake the boards apart.
Locking Systems & Floated Floors
Laminate flooring is designed to be installed floating over an underlay. A floated floor stays in place under its weight. The locking system around the perimeter of a board that interlocks with each board around it stops individual boards from coming apart. Valinge 2G and 5G locking systems are the easiest to install in large open areas. You will easily outpace a uni-clic locking system in these parts of the house.
However, Uniclic 4-sided locking systems make working around difficult areas like door jams easier and will likely regain any time you lose over other locking systems in the open areas. We recommend reading this article about click-in flooring systems to understand locking systems further.
2G locking system.
5G locking system example.
Engaging Locking Systems
- Use a tapping block to tap each board, gently engaging the locking system. We find the best tapping block is a decent offcut of your laminate board. This is better than a generic tapping block as the joins fit together perfectly, distributing pressure across the whole joint, not isolated areas, which will damage your locking system.
- The clicking sensation with laminate boards is a little louder than a hybrid, meaning you will quickly know when it is in place. If the board refuses to go in, remove it, check for obstructions beside and below, and try again.
- After laying a few laminate flooring runs, you will establish a feel for the product. You may find that you start to ‘feel’ the joins engaging and no longer feel the need to tap the boards together. This is fine, but ensure that you get this feel for the product first and keep checking as you go to make sure that the joins are engaged properly.

Expert Insights From Levi Saunders
Online Retail Specialist & Flooring Content Creator
Use silicone filler in moderation to fill small gaps between the skirting and the wall.
Reinstalling Scotia and Skirting
If you reuse the existing skirting, you can return it to how you took it off:
- So start with piece number ‘one’ and work your way back around the house.
- If you are nailing your skirtings back into place, insert nails at slightly opposing angles as you work your way down each piece. For example, if you put your first nail in with a right-facing angle, do the next with a left. Continue this down each piece of skirting.
- Adhesive can be used, but it is a much more permanent option and will make skirting harder to remove if you ever go down this path again.
- Again, Scotia is installed similarly; however, you have less area to work with, requiring more nails.
- It is best to nail both ends of your piece of Scotia or skirting first and then the centre. Next to the centre of each new centre you have created, follow this process until you have enough nails to hold your skirting in place.
- Use a drop saw to cut Scotia and skirting. Cut corners by cutting two pieces at half the angle where they join. Since most corners are 90°, cut each piece at a 45° angle. If your corner is 45°, cut your two boards at 22.5°, and so on.
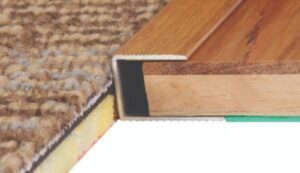
Understanding Floor Trims
You will then have to decide which trims to use via doorways and into wet areas, typically C and L channels.
C Channels
C Channels are similar to a square C shape, and the bottom bit is longer than the top to make it easy to nail/stick to the floor. In most C channels have to be laid before the flooring goes down, as you put the cut edge of a product into the ‘C’, and lay the floor outwards from there.
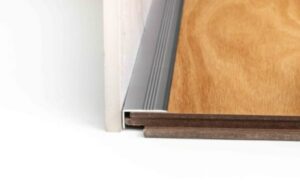
L Channels
L Channels are similar in appearance to ‘C Channels’ but don’t have the bottom section, making them a rotated ‘L’ shape. They are installed by adhering the back of the trim to sliding door tracks, walls, or any other vertical surface. If you have a surface to adhere them against, they are a little more versatile for entry points, such as metal sliding door frames, as they can be installed after the floor is finished.
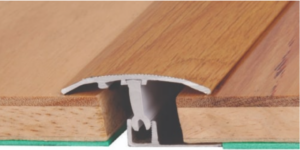
Universal Trims
Universal trims join areas of the same or similar height. This is the main option when expansion breaks have to be installed on a floor.
They consist, in most cases, of 3 parts. The base, the connector and the top.
- You either bond or nail the base to the ground before installation, if required. Then, you install the floor with the necessary clearance on either side of the base to allow for expansion.
- Once you complete this, you slot the connector into the top section, which then drops into the base. Many variations on this design exist, but they all serve the same purpose. You can use Universal trims as ramp trims where there is only a small difference between the two floor areas they connect.
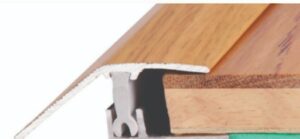
Ramp Trims
You can use ramp trims to reduce a sharp drop in areas. They are similar to the Universal Trim, but the cover section is shaped for a much larger drop. In all other respects, you install them in the same way as a Universal Trim.
- While the types of trims vary from supplier to supplier, they all perform the same functions. For example, there is a trim known as a ‘Border Trim’. This performs the same function as both a ‘C’ and ‘L’ Channel, but it is a three-part trim like a universal trim and installs in the same way.
- There are also variations of the Universal and Ramp trims that lack the base and connectors but use plastic plugs drilled into the slab. However, a supplier’s trim offering always covers all of the joining options.
- Additionally, some suppliers offer colour-matched trims for their floors; some offer different colours across their entire range, and some offer anodized metal options.

Expert Insights From Dean Billett
28+ Years of flooring industry experience
If you are struggling to engage a board, it is always better to check the joins for debris rather than apply excessive force and risk damaging your flooring.
Laminate Installation FAQ’s
A floating floor is any floor not fixed to the subfloor and held in place under its own weight. The locking system keeps each individual board in place horizontally. The combined weight of the flooring holds the entire raft in place.
Laminate flooring can be installed over hard surfaces such as PVC, ceramic tile, and concrete, provided it’s an even surface like a subfloor.
Laminate flooring cannot be installed over surfaces such as carpet, carpet underlays, existing floated flooring and timber unless the timber floor is structural and can breathe from the other side.
This area is contentious because many underfloor systems are guaranteed with any floor covering, but the floor covering is often not guaranteed for use with the heating system. Underfloor heating companies are more focused on educating you about how their product can be used than flooring companies are.
However, the trend is changing, and many flooring suppliers are starting to allow their products to be used over underfloor heating systems.
Ultimately, if one side of this equation does not allow the usage, it is best to be cautious and avoid warranty issues.
The Livella Electric Underfloor Heating System guarantees that it may be used under any floor covering with certain temperature restrictions.
You should always refer to and abide by supplier guidelines to ensure your floor covering is covered by warranty.
Generally, you should not use laminate flooring in bathrooms. Certain products now come with water warranties, allowing them in places like laundries and toilets. However, it is best to check and assume it is unsuitable, with some exceptions. While some products are technically rated for bathroom use, levelling the floor for drainage remains a significant issue. This usually negates the use of laminate in bathrooms, even if rated for such use. You cannot use any kind of laminate flooring in a shower tray. Eclipse Aqua Schild Laminate is totally water-proof, and the Eclipse Aqua Guard Laminate has a 96-hour fully submerged water warranty.
A general rule of thumb is about 10 millimetres, but everything depends on the supplier’s installation requirements. Always refer to your product’s installation guide. Expansion gaps are essential around walls and every fixed object in the house.
Use a specific laminate floor cleaner. Products such as Aqua Schild will allow steam mopping on the floor, but most other laminate products will not. Sweeping and a light-damp mop are the most effective ways to clean regularly.
No, you can never nail down laminate flooring. This is a very bad idea and will completely compromise the product.
Typically, you want the boards to run at the longest length of your house. This is generally wise, as most laminates allow for greater dimension on their raft sizes on the length than the width. However, you may choose to run the product any way you choose. Just keep raft sizes in mind when you are planning this out.