Laying carpet tiles is an easy, effective way to upgrade your home or business floors, adding style and durability to any space. The process is simple, with the proper steps, essential tools, and subfloor preparation.
With guidance, anyone can achieve a professional finish that will significantly impact any space. We walk you through laying carpet tiles from start to finish, including expert tips on handling obstacles and aftercare.
Preparation for Laying Carpet Tiles
Gather Tools and Materials
Before you start, make sure you have everything you need.
Here’s what you’ll want to have on hand:
- Carpet tiles
- Utility knife
- Measuring tape
- Chalk line
- Straightedge
- Adhesive or double-sided carpet tape
- Soft-bristle broom or vacuum cleaner
Acclimate the Carpet Tiles Pre-Installation
Acclimatising timber flooring is essential before installation, but did you know that acclimatising carpet tiles is also key? Let your carpet tiles adjust to the room’s temperature and humidity. Leave them in the room for 24 hours before installation to allow for any expansion or contraction.
This is especially important if you’re wondering how to lay carpet tiles on concrete, as concrete floors are more sensitive to temperature shifts. This simple step prevents the newly installed carpet tiles from shifting or buckling over time.
Prepare the Subfloor
This can be a long-winded or relatively short step, depending on the condition of your existing subfloor. Subfloor preparation is essential for a clean installation.
A well-prepared subfloor keeps tiles secure and ensures an even finish.
Here are some essential steps:
- Clean Thoroughly: Use a vacuum cleaner or broom to remove dust and debris.
- Check for Moisture: Make sure the floor is dry, especially for concrete, as moisture can impact the adhesive and the tiles’ longevity.
- Repair Imperfections: Fill in cracks or uneven areas, creating a smooth surface that keeps the tiles in place.

Expert Insights From Raquel Billett
Interior Décor Expert
Compared to subfloor preparation for solid flooring types such as hybrid, engineered timber, laminate, and tiles, you can afford to be slightly more relaxed regarding subfloor tolerance. That said, if the subfloor is notably uneven to the naked eye with troughs and peaks over 5mm in depth, that may require fixing before installing carpet tiles.
Choose Your Lay Style
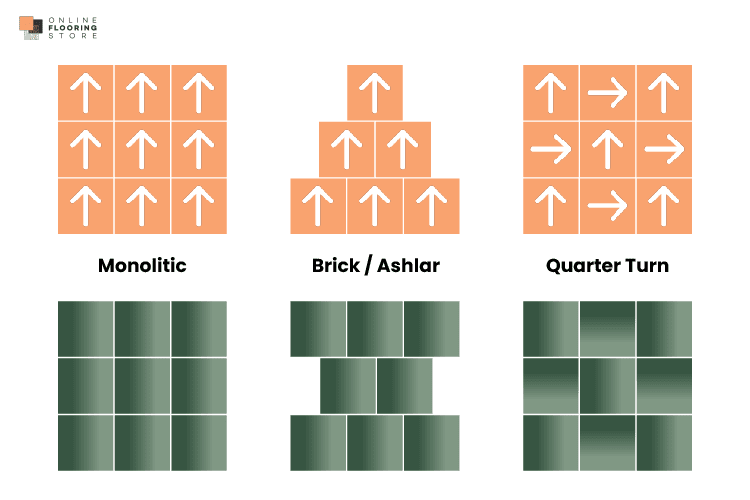
Carpet tiles offer several pattern options, so take a moment to visualise the look you want:
- Monolithic: All tiles face the same direction for a seamless look.
- Quarter-Turn: Rotate each tile 90 degrees, creating a checkerboard effect.
- Ashlar: Offset each row in a similar pattern to a brick.
Having a pattern in mind will help you stay consistent and achieve a polished finish.
Finding the Middle of the Room and Setting Guidelines
Finding the Centre Point
Starting your tile layout from the centre of the room helps ensure a balanced, professional look. This approach avoids ending up with uneven or minor cuts along the walls.
Here’s how to find and mark the centre:
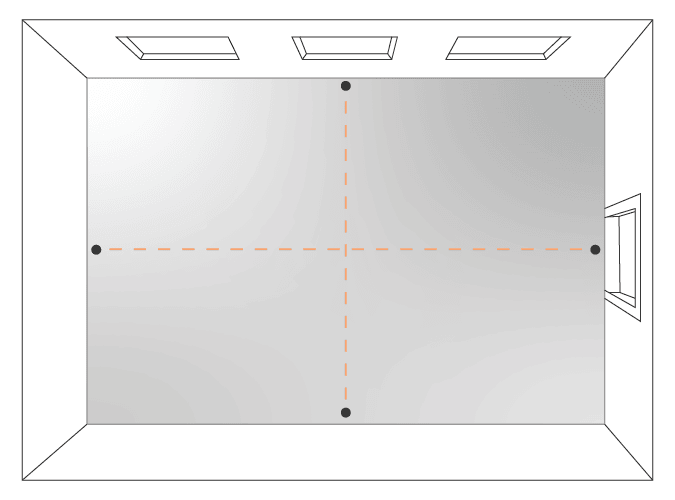
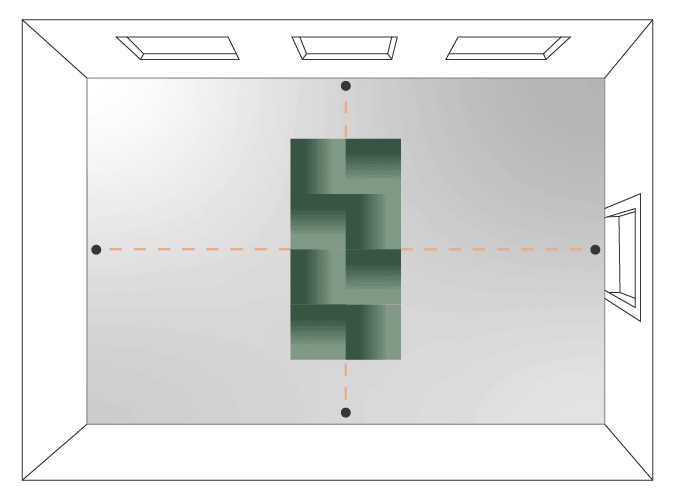
- Measure and Mark the Centre: Measure the midpoint of each wall and mark these points. Use a chalk line to connect opposite walls, creating a cross that intersects at the room’s centre. This will be your starting point, ensuring tiles are laid evenly outward.
Squaring Up Guide Lines
Ensuring the tiles are lined up perfectly square makes all the difference for a clean, consistent look. Take a few extra moments here for a layout that looks and feels polished.
- Check for Square Lines: Using a right angle or a carpenter’s square, make sure the guidelines intersect at a perfect 90-degree angle. This prevents your layout from drifting and keeps the lines straight.
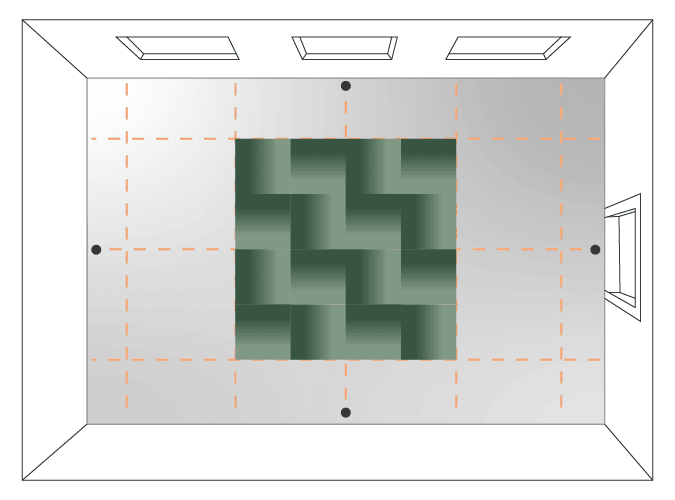
- Additional Guide Lines (Optional): You might want to snap a few extra chalk lines parallel to the centre lines for larger rooms. This will help keep tiles aligned as you expand outward.
Laying the Carpet Tiles
Starting from the Centre
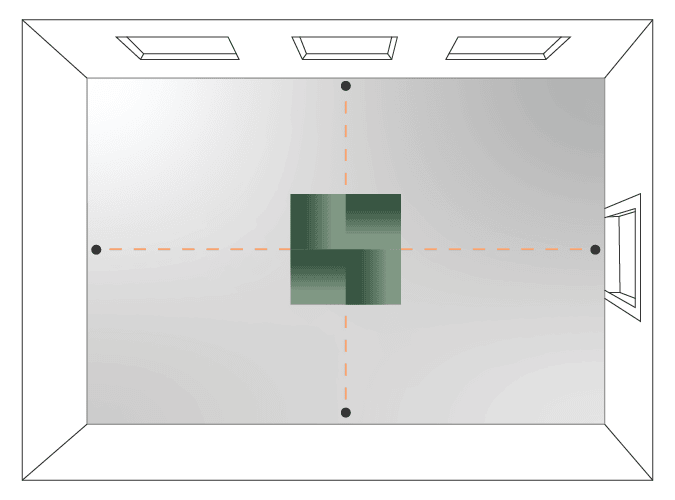
Now that your guidelines are set, you can start laying carpet tiles from the centre and work outward. This method ensures tiles are evenly distributed and symmetrical.
- Place the First Tile: Align the first tile with the chalk lines at the centre. This first tile is your anchor point, so ensure it’s perfectly in place. It will set the foundation for the rest.
- Work Outward: Continue placing tiles outward along the guidelines, following your chosen pattern (monolithic, quarter-turn, or ashlar). Check alignment as you go to ensure a balanced, seamless look.
Carpet Tile Installation with Double-Sided Tape
If you’re using double-sided carpet tape instead of adhesive.
Here’s how to secure each tile:
- Apply the Tape: Place strips of double-sided carpet tape around the edges of the tile and in the centre. Peel off the backing to expose the sticky surface.
- Press Down Firmly: Position each tile carefully and press it down firmly. This helps it adhere securely, and double-checking alignment as you go will keep rows straight.
Laying Tiles with Adhesive
If you’re opting for adhesive instead of tape, make sure to apply it evenly for a secure hold:
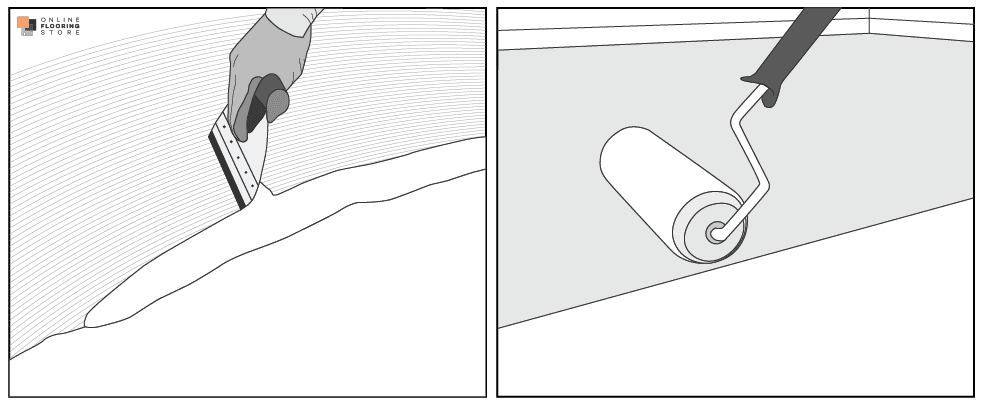
- Apply Adhesive in Sections: Use a trowel or roller to spread adhesive over a small subfloor (working in sections prevents the adhesive from drying out too quickly).
- Place Each Tile: Carefully position each tile on the adhesive and press it down firmly. Continue laying tiles outward, applying adhesive in sections to ensure a clean, strong bond.
Following these steps, you’ll achieve a durable, well-adhered carpet tile installation that looks professional and polished.
How to Cut Carpet Tiles for Obstacles and Ends
Measuring and Marking for Cuts
Knowing how to cut carpet tiles accurately is essential for a clean, finished look on edges, doorways, or other obstacles.
Here’s how to handle tricky areas:
- Measure Carefully: Measure the space where the tile needs to fit, including any corners or irregular shapes. Mark the measurements on the back of the tile to avoid cutting into the carpet fibres.
- Use a Straightedge: Place a straightedge along your markings to guide the cut. This will help you achieve a precise edge that fits snugly against walls or around obstacles.
Making Clean Cuts
Now that you’ve measured and marked, it’s time to cut the tiles to fit around edges or fixtures:
- Use a Utility Knife: Cut from the back of the tile with a sharp utility knife against a straight edge for a clean, controlled cut. Press firmly along the straightedge to ensure a straight line.
- Test the Fit Before Securing: Place the cut tile in position to ensure it fits well. Make any minor adjustments before securing it with adhesive or tape for a seamless look.
Final Installation Checks
Press and Secure the Tiles
With all the tiles in place, it’s essential to make sure they’re firmly adhered and aligned for a flawless finish:
- Press Down Each Tile: Go over each tile with a roller or press down firmly to ensure it’s fully adhered. This is especially important for tiles installed with adhesive to prevent any loose edges.
- Double-Check Alignment: Inspect the entire floor to ensure tiles are tightly aligned with no visible gaps. Adjust any misaligned tiles before the adhesive sets fully.
Clean Up
Once the installation is complete, a quick clean-up will make your new flooring look pristine:
- Sweep or Vacuum the Area: Remove loose fibres or debris from cutting and pressing the tiles.
- Dispose of Scraps and Backing: If you use peel-and-stick tiles, dispose of the backing paper and any other scraps responsibly.
Carpet Tile Maintenance and Aftercare
Proper care after installing your carpet tiles will help them look great for years. Maintenance is easy, anyway!
Here are some simple aftercare tips:
Regular Cleaning
- Vacuum Frequently: Regularly vacuum the carpet tiles to remove dust and debris. This prevents dirt from settling into the fibres, keeping the tiles fresh and extending their lifespan.
- Spot Clean as Needed: Act quickly on spills or stains. Blot the stain with a damp cloth and a gentle cleaner, avoiding excess moisture that could seep into the subfloor.
Maintaining Adhesion
- Check for Loose Tiles: Inspect the tiles periodically to ensure they’re still securely in place. If you notice any edges lifting, reapply adhesive or double-sided tape to keep them firmly in place.
- Avoid Excessive Moisture: Keep water use to a minimum on carpet tiles, as excessive moisture can weaken the adhesive. Always dry any wet spots promptly to protect the tiles and the subfloor.
Laying carpet tiles is a fantastic, DIY-friendly way to enhance any room. With the right preparation and careful attention to detail, you can achieve a professional finish that elevates your space.
Explore our range of quality carpet tiles designed for durability and style. Contact our team for expert advice on choosing the suitable tiles or help with installation!
FAQs for Carpet Tile Installation
To install carpet tiles, you’ll need a utility knife, measuring tape, chalk line, straightedge, adhesive or double-sided carpet tape, and a soft-bristle broom or vacuum cleaner. Having these on hand ensures an accurate and smooth installation.
Clean the subfloor thoroughly, removing dust and debris. Check for moisture (especially on concrete floors) and repair any cracks or uneven areas to create a smooth, dry surface for proper adhesion. Also, there should be no obvious dips or high points throughout the subfloor over 5mm, which can cause problems post-installation.
Yes, carpet tiles can be installed on concrete. Ensure the concrete is clean, dry, and level. Acclimate the tiles to room temperature and humidity for at least 24 hours before installation to prevent shifting or buckling.
Measure the area where the tile needs to fit and mark the back of the tile. Use a sharp utility knife and a straightedge to cut cleanly. Test the fit before securing the tile with adhesive or tape.
Carpet tiles can be secured using either double-sided carpet tape or adhesive. For tape, place it around the edges and centre of the tile before pressing it down. For adhesive, apply evenly to the subfloor in small sections and press the tiles firmly into place.
Carpet tiles are one of the most accessible flooring options, making them ideal for DIY installation. They typically require minimal tools and preparation, and their modular design allows for straightforward placement and adjustments. The process is manageable for most skill levels, whether you use peel-and-stick tiles, adhesive, or double-sided tape.
Plus, the ability to cut tiles to fit around obstacles ensures a custom, professional-looking finish without the need for specialised expertise.


